Understanding Color: The Key to Natural-Looking Images
In our previous lessons, we mastered exposure (aperture, shutter speed, ISO) and camera modes (Manual, Aperture Priority, etc.). Now we turn to another critical aspect of photography: color. White balance determines whether your images look natural or have unwanted color casts — and understanding it opens up creative possibilities.
Let us explore how light affects color, how to control it, and how to use white balance creatively.
1. What is White Balance?
White balance is your camera’s ability to render colors accurately under different lighting conditions. The human brain automatically adjusts for different light sources — we see a white piece of paper as white whether it is in sunlight or under a lamp. Cameras need help to do the same.
White balance removes unrealistic color casts so that objects that appear white in person are rendered white in your photo.
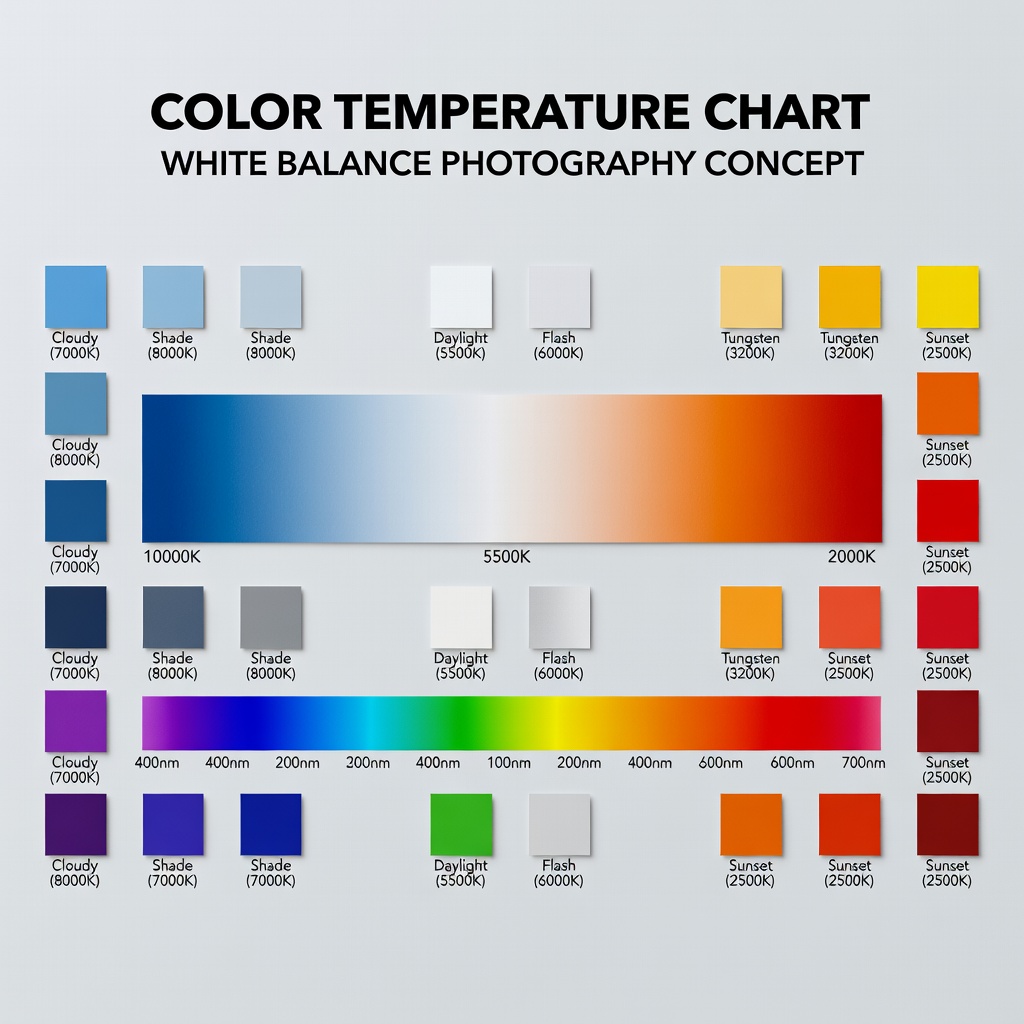
Color Temperature in Kelvin
Light sources have different “temperatures” measured in Kelvin (K):
- Low Kelvin (2000-4000K): Warm/orange light (candlelight, tungsten bulbs)
- Mid Kelvin (5000-6000K): Neutral/white light (midday sun, electronic flash)
- High Kelvin (7000-10000K): Cool/blue light (shade, overcast sky, blue hour)
Counterintuitively: higher Kelvin = cooler (bluer) light, lower Kelvin = warmer (orange) light.
2. How Light Has Different Color Temperatures
Candlelight (1800-2000K)
Extremely warm, orange/yellow. Romantic, intimate feel.
Example: Dinner table scene — skin tones glow warmly, shadows are rich.
Tungsten/Incandescent (2500-3200K)
Warm, orange. Common in household bulbs.
Example: Indoor portraits without flash — skin can look unnaturally orange if not corrected.
Fluorescent (4000-5000K)
Varies widely. Often greenish tint (especially older tubes).
Example: Office or store lighting — can create sickly green skin tones.
Daylight (5000-6500K)
Neutral white. Midday sun, electronic flash.
Example: Outdoor portraits at noon — natural-looking colors.

Overcast (6500-8000K)
Cool, blue. Cloudy days.
Example: Landscape photography — can look moody and dramatic.
Shade (7000-10000K)
Very cool, blue. Subjects in shadow on sunny days.
Example: Portraits in shade — skin can look unnaturally blue without correction.
Blue Hour (9000-12000K)
Extremely cool, deep blue. Twilight after sunset.
Example: Cityscapes — dramatic blue tones with warm artificial lights.

3. White Balance Modes
Your camera offers several white balance options:
Auto White Balance (AWB)
Camera analyzes the scene and guesses the correct white balance.
Pros: Convenient, often works well in mixed lighting.
Cons: Can be inconsistent, may guess wrong in tricky lighting.
Presets
Pre-programmed settings for common lighting conditions:
- Daylight (5200K): Bright sunny days
- Shade (7000K): Subjects in shade on sunny days
- Cloudy (6000K): Overcast days
- Tungsten (3200K): Indoor incandescent lighting
- Fluorescent (4000K): Fluorescent lighting
- Flash (5500K): Electronic flash
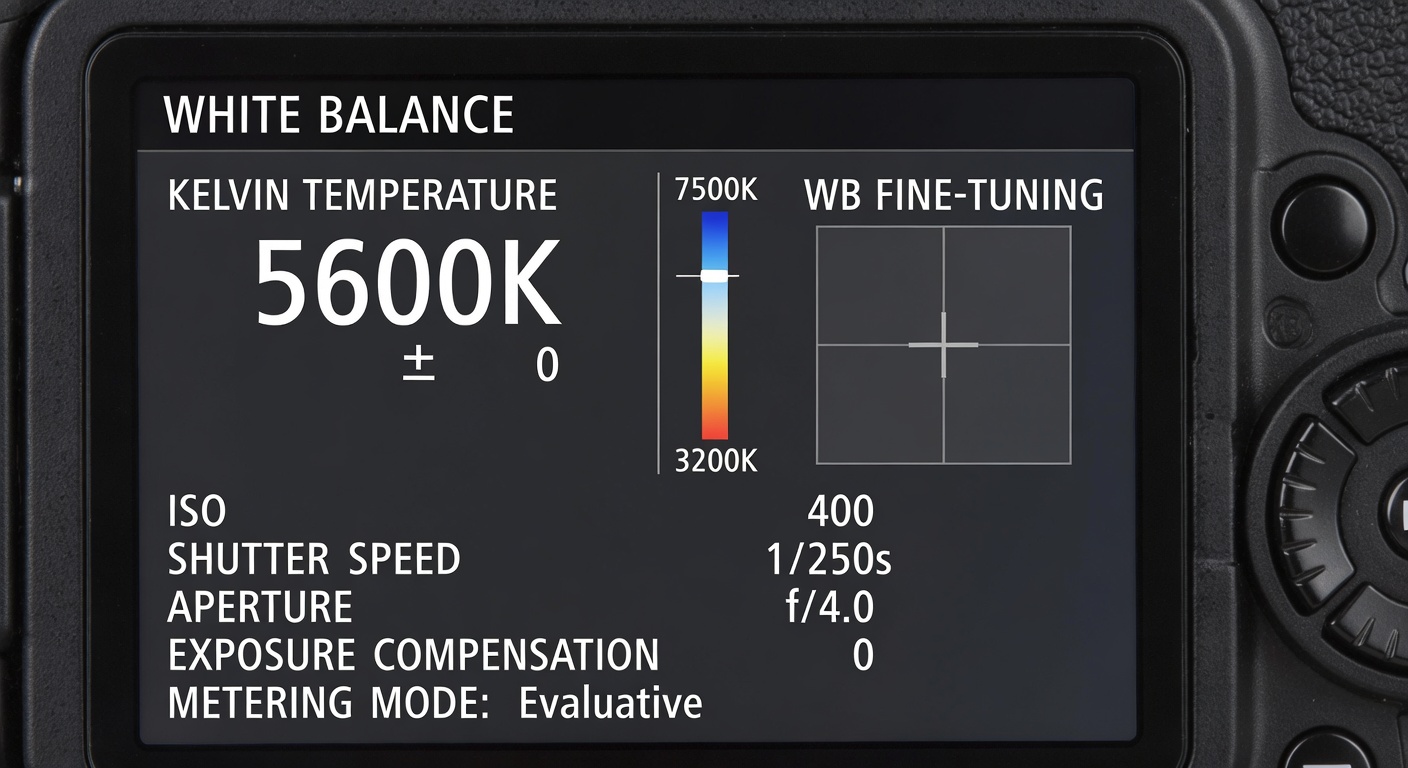
Custom/Kelvin Mode
Manually set the exact Kelvin temperature.
Pros: Complete control, consistency across shots.
Cons: Requires knowledge and testing.
Custom White Balance
Use a gray card or white object in the actual lighting to set perfect white balance.
How: Photograph a gray card, tell camera “this is neutral,” camera calculates correction.
4. When to Use Each Preset
| Lighting Condition | Preset | Kelvin | Notes |
|---|---|---|---|
| Bright sunny day | Daylight | 5200K | Neutral, accurate colors |
| Overcast sky | Cloudy | 6000K | Warms up cool blue cast |
| Subject in shade | Shade | 7000K | Significantly warms blue shadows |
| Indoor incandescent | Tungsten | 3200K | Cools down orange cast |
| Fluorescent lighting | Fluorescent | 4000K | Corrects green/magenta casts |
| Electronic flash | Flash | 5500K | Matches flash color temperature |
5. Creative Uses of White Balance
White balance is not just about accuracy — it is a creative tool.
Warming for Emotion
Set higher Kelvin than needed (e.g., use Shade preset in daylight) to create warm, golden tones. Perfect for portraits, sunsets, romantic scenes.
Cooling for Mood
Set lower Kelvin than needed (e.g., use Tungsten in daylight) to create cool, blue tones. Great for night scenes, mystery, melancholy.
Mixed White Balance
Shoot scenes with mixed lighting (e.g., tungsten interior with blue twilight outside). The contrast creates visual interest.
White Balance for Black and White
Different white balance settings affect how colors convert to grayscale. Experiment to see which creates the most dramatic contrast.
6. Shooting in RAW and Adjusting in Post
This is the most important tip: shoot RAW.
RAW files contain all the data from your sensor, including white balance information. You can adjust white balance non-destructively in post-processing with no quality loss.
Post-Processing Workflow
- Import RAW files into Lightroom, Capture One, or similar
- Use eyedropper tool on a neutral gray or white area
- Fine-tune with Temperature (blue-yellow) and Tint (green-magenta) sliders
- Apply to multiple shots with similar lighting
Example: Outdoor wedding in mixed shade/daylight. Shoot RAW at Auto. In Lightroom, batch-adjust to 6200K — perfect skin tones across hundreds of shots in seconds.
7. Common Mistakes and How to Fix Them
Mistake 1: Relying Solely on AWB
Symptom: Inconsistent colors across a series of shots.
Fix: Use presets or Manual Kelvin for consistency.
Mistake 2: Forgetting Mixed Light
Symptom: Patchy color casts (blue window light, orange room light).
Fix: Choose one dominant light source, use gels on lights, or shoot RAW and adjust.
Mistake 3: JPEG-Only Shooting
Symptom: Locked-in bad white balance with limited correction options.
Fix: Always shoot RAW for flexibility.
Mistake 4: Ignoring Tint
Symptom: Green or magenta casts (common with fluorescent lighting).
Fix: Use Fluorescent preset and adjust Tint slider.
Mistake 5: Overcorrecting
Symptom: Flat, unnatural colors.
Fix: Aim for neutral whites but keep skin tones lifelike.
Mistake 6: Shade/Sunlight Mixup
Symptom: Outdoor portraits in shade look unnaturally yellow.
Fix: Use Shade preset (7000K) not Daylight (5200K).
Conclusion: Your Color Mastery Journey
White balance is both a technical necessity and a creative opportunity. Start by learning to achieve accurate colors, then experiment with creative deviations.
Remember: shoot RAW whenever possible. This gives you maximum flexibility to correct or creatively adjust white balance after the fact.
In our next lesson, we will explore composition techniques — building on your understanding of exposure and color to create visually compelling images. Composition is where technical knowledge meets artistic vision.
Your action plan: Go out and shoot the same scene with different white balance settings. Notice how color affects mood and storytelling.