Beyond the Rule of Thirds: Advanced Composition Techniques
In our previous composition lesson, we explored the Rule of Thirds, symmetry, patterns, and color. Now, let us dive deeper into three powerful techniques that transform ordinary scenes into compelling images: framing, leading lines, and perspective. These tools work beautifully with the Rule of Thirds to create photographs that not only look good but tell stories.
Master these techniques, and you will see the world through a composer’s eyes — always looking for frames, lines, and angles that elevate your photography.
1. Framing Techniques
Framing uses elements within your scene to create a “frame within a frame” that draws attention to your subject. This technique adds depth, context, and focus.
Natural Frames
Elements from nature that create organic frames:
- Tree branches/foliage: Overhanging branches create natural arches
- Rock formations: Caves, arches, openings in rocks
- Flowers/plants: Foreground vegetation framing a subject
Example: A portrait framed by cherry blossoms in spring — the blossoms create a soft, natural frame that emphasizes the subject.

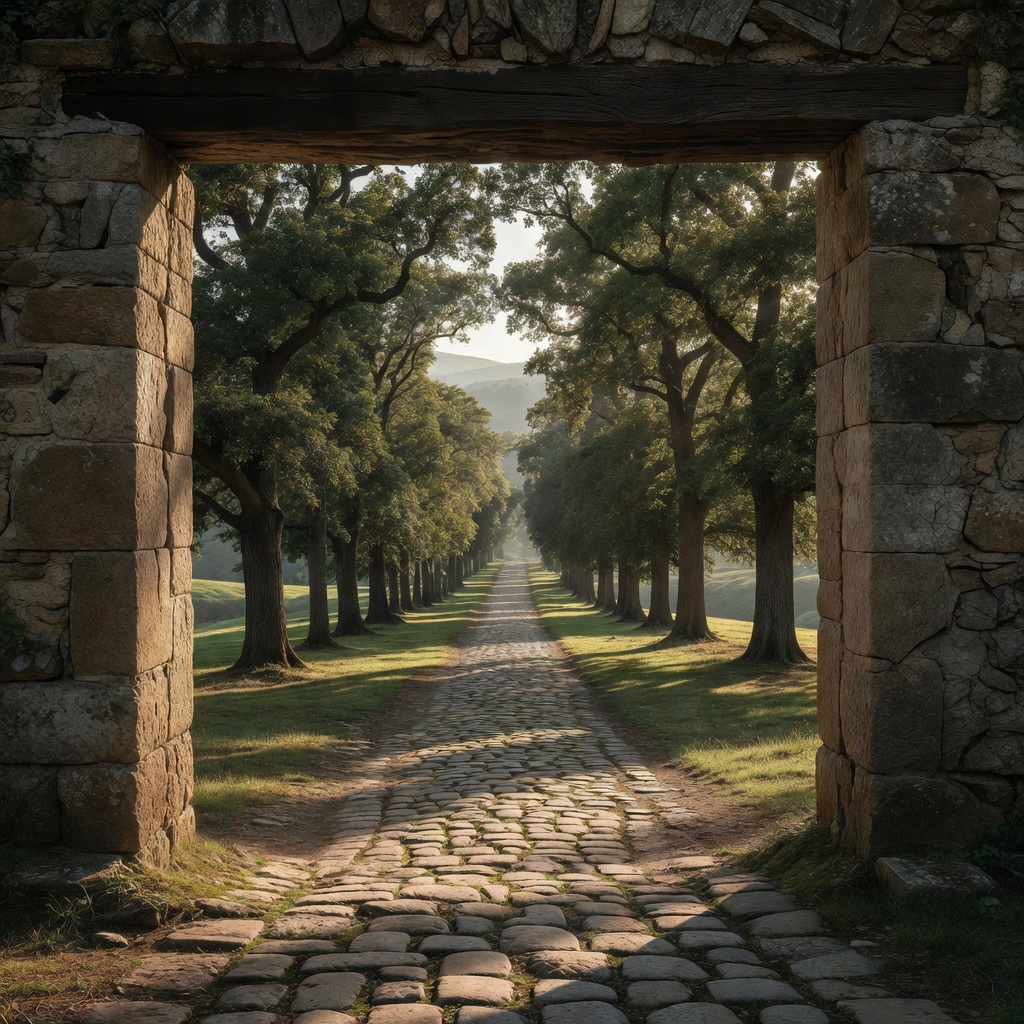
Architectural Frames
Man-made structures that create geometric frames:
- Windows/doors: Classic framing elements
- Archways/tunnels: Creates depth and leads the eye
- Bridges: Arches frame scenes beyond
- Columns/pillars: Creates symmetry and structure
Example: A cityscape framed by a window — the window creates context (indoor/outdoor) and adds layers to the image.
Implied Frames
Elements that suggest a frame without fully enclosing the subject:
- Shadows: Dark areas that frame lighter subjects
- Light: Pools of light that isolate subjects
- Color contrast: Areas of contrasting color that frame
Example: A subject standing in a beam of sunlight in a dark room — the darkness frames the lit subject.
How to Use Framing Effectively
- Keep it subtle: The frame should enhance, not overwhelm
- Ensure focus: The subject should be the sharpest element
- Consider depth: Use aperture to control focus on frame vs subject
- Align with Rule of Thirds: Place framed subject on power points
2. Leading Lines
Leading lines guide the viewer’s eye through the image, ideally toward your main subject. They create movement, depth, and narrative.
Types of Leading Lines
Converging Lines
Lines that appear to meet at a vanishing point, often in the distance.
Examples: Railway tracks, roads, hallways, rows of trees.
Effect: Creates strong depth and draws the eye deep into the image.

Diagonal Lines
Lines that run diagonally across the frame.
Examples: Staircases, fences, shadows, architectural elements.
Effect: Adds energy, movement, and dynamism.
Curved Lines
Gentle, flowing lines that meander through the frame.
Examples: Rivers, winding roads, pathways, coastlines.
Effect: Creates graceful, organic movement; feels natural and soothing.
Implied Lines
Lines created by suggestion rather than physical objects.
Examples: A subject’s gaze, pointing gestures, direction of movement.
Effect: Subtle but powerful psychological guidance.
How to Use Leading Lines Effectively
- Lead to your subject: Lines should point toward, not away from, your main subject
- Start at the edge: Lines entering from corners work best
- Use Rule of Thirds: Place vanishing points on power points
- Consider line weight: Thicker, more prominent lines have stronger pull
3. Perspective
Perspective refers to your camera’s position relative to the subject. Changing perspective dramatically alters how viewers perceive your subject.
High Angle (Bird’s Eye View)
Shooting from above looking down.
Effects:
- Subjects appear smaller, vulnerable
- Great for patterns, crowds, food photography
- Can make landscapes appear vast
Example: Drone photography of a winding river — reveals patterns invisible from ground level.
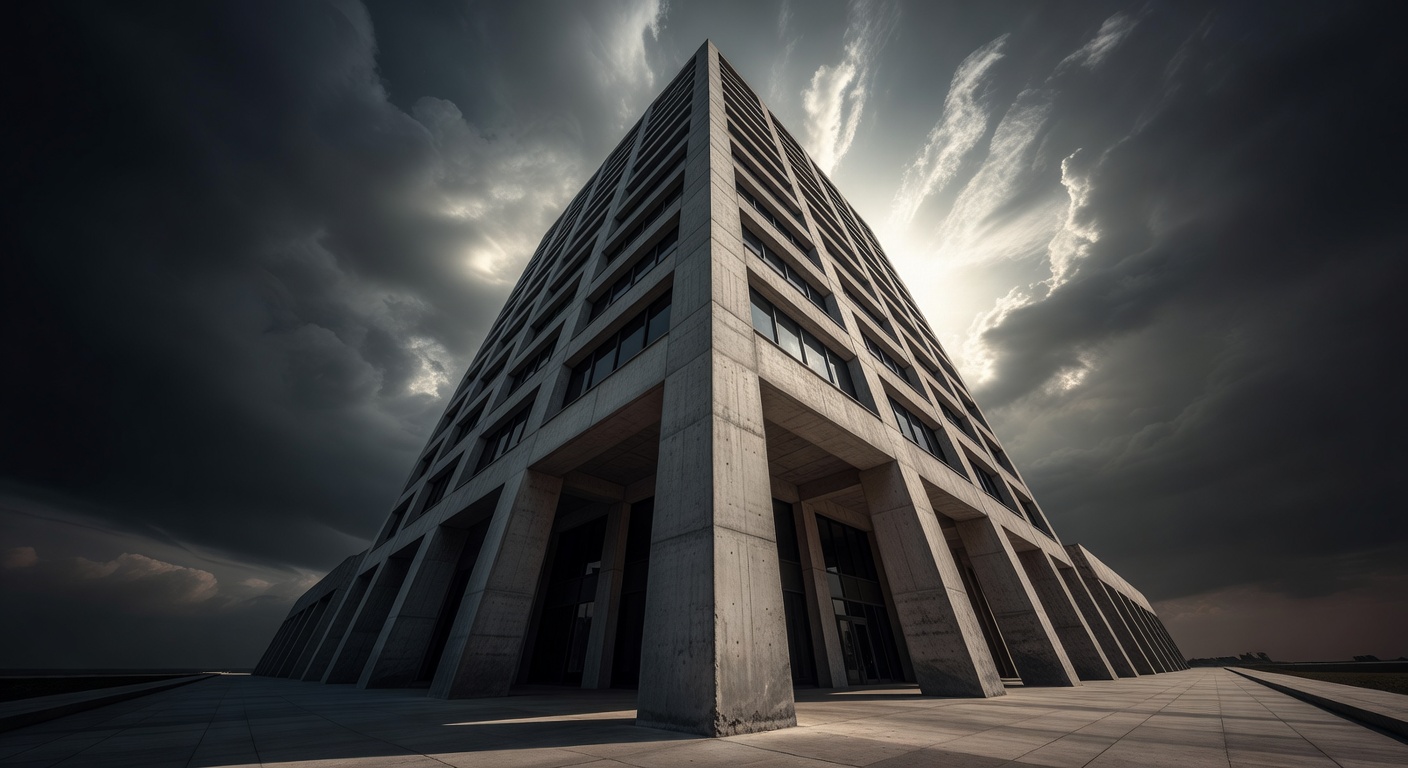
Low Angle (Worm’s Eye View)
Shooting from below looking up.
Effects:
- Subjects appear larger, more powerful
- Creates drama and grandeur
- Great for architecture, monuments, portraits
Eye Level
Shooting from the same height as your subject.
Effects:
- Creates intimacy and connection
- Most natural perspective for portraits
- Common but can be boring if overused
Forced Perspective
Using optical illusion to make objects appear larger, smaller, closer, or farther than they actually are.
Techniques:
- Place small object close to lens, large object far away
- Align objects to create surprising relationships
- Use wide-angle lenses to exaggerate perspective
Example: Person “holding” the moon between thumb and forefinger — classic forced perspective.
4. How These Techniques Work Together
The most powerful compositions combine multiple techniques. Here is how they complement each other:
Framing + Leading Lines
A natural frame (tree branches) with leading lines (path) guiding to a subject placed on a Rule of Thirds intersection.
Perspective + Leading Lines
Low angle perspective looking up a staircase (leading lines) to a subject at the top.
All Three Combined
Archway (frame) with hallway (leading lines) shot from low angle (perspective) with subject on Rule of Thirds.
5. Practical Exercises
Exercise 1: Framing Hunt (30 minutes)
Find and photograph 10 different frames: 3 natural, 3 architectural, 2 implied, 2 creative. For each, place a subject using Rule of Thirds.
Exercise 2: Lines Expedition (45 minutes)
Find 5 converging lines, 5 diagonal lines, 5 curved lines. Ensure each leads to a clear subject. Try different perspectives for each.
Exercise 3: Perspective Challenge (1 hour)
Photograph the same subject from: high angle, low angle, eye level, and forced perspective. Compare the emotional impact.
Exercise 4: Combo Mastery (2 hours)
Create 5 images combining at least 2 techniques each. Share with a photography group for feedback.
6. Common Mistakes and How to Avoid Them
Mistake 1: Framing Clutter
Problem: Frame overwhelms the subject.
Fix: Simplify — zoom in, crop in post, ensure subject dominates.
Mistake 2: Leading Lines Off-Target
Problem: Lines miss the subject or exit the frame.
Fix: Preview in viewfinder; physically move to align lines with subject.
Mistake 3: Flat Perspective
Problem: All shots from eye level = boring.
Fix: “Change your elevation” — crouch, climb, lie down for every shot.
Mistake 4: Forced Perspective Distortion
Problem: Uneven spacing ruins the illusion.
Fix: Use grid overlay; practice with ruler for scale.
Mistake 5: Overkill Combo
Problem: Too many techniques = visual chaos.
Fix: Start simple — one new technique per shoot.
Mistake 6: Ignoring Light
Problem: Lines/frames flop in harsh light.
Fix: Shoot during golden hour — soft shadows enhance everything.
Conclusion: Your Composition Toolkit Expands
Framing, leading lines, and perspective are not rules — they are tools. Like any tools, they work best when used thoughtfully and in combination with what you have already learned (Rule of Thirds, exposure, color).
In our next lesson, we will explore creating depth and dimension in your photos — techniques that make two-dimensional images feel three-dimensional. This builds directly on your understanding of perspective and framing.
Your assignment: Go out and create one image that combines framing, leading lines, and an unusual perspective. Share it and tag what techniques you used.